Assembly-level Debugging
You can examine your program at the assembly level, as well as the source level. You can also examine the registers, I/O ports and the 80x87 FPU registers using the following windows:
Register window
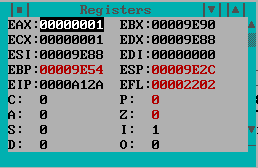
You can open the Register window by choosing Register from the Data menu. The register names and values are displayed in this window. As you execute your program, registers that have changed since the last trace or breakpoint are highlighted.
To modify a register value, double-click on the value, or cursor to it and press Enter. Press the right mouse button to access the following popup menu items:
- Modify
- Change the value of the selected register.
- Inspect
- Open a Memory window displaying the memory contents of the address specified by the register. If a segment register is selected, memory at offset 0 in the segment is displayed.
- Hex
- Toggles the register window display format between hexadecimal and decimal.
- Extended
- Displays the Extended 386 register set. This menu item sets options on a per-window basis, overriding the global settings. When you use the menu item to change these settings, they aren't saved between debugging sessions. To change an option permanently, see ``Window Options Dialog.''
Assembly window
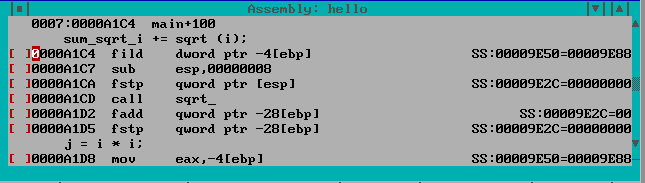
You can open the Assembly window by choosing Assembly from the Code menu. You can Inspect an item by double-clicking on it, or by cursoring to it and pressing Enter. Press the right mouse button to access the following popup menu items:
- Inspect
- When you select a memory address, register, or operand, and use Inspect, the debugger opens a Memory Window displaying the selected memory address.
- Break
- If a code address is selected, this command sets a
break-on-execute breakpoint at the selected code address.
If a variable address is selected, this command sets a break-on-write breakpoint at the selected address. Note that this doesn't set a break-on-execute breakpoint at the current line; use Toggle or At Cursor from the Break menu to do that.
- Enter Function
- Resume program execution until the selected function is executed.
- Show/Source
- Display the source code associated with the selected assembly line.
- Show/Functions
- Show the list of all functions defined in the current module.
- Show/Address
- Reposition the window at a new address. You're prompted for an expression. Normally you would type a function name, but you can type any expression that resolves to a code address. For example, you might type the name of a variable that contains a pointer to a function. For more information about expressions, see the Expression Handling chapter.
- Show/Module...
- Show a different module. You're prompted for its name in a dialog. As a shortcut, you can type the beginning of a module name and click the Module... button. This displays a list of all modules that start with the text you typed.
- Home
- Reposition the window to the currently executing location. The cursor moves to the next line of the program to be executed.
- Hex
- Toggle the Assembly window display between hexadecimal and decimal. This menu item sets options on a per-window basis, overriding the global settings. When you use the menu item to change these settings, they aren't saved between debugging sessions. To change an option permanently, see ``Window Options Dialog'' in the Debugger Environment chapter.
I/O Ports window
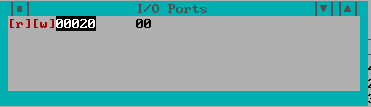
Choose I/O Ports from the Data menu to open the I/O Ports window. Use this window to manipulate I/O ports. This is supported only when the operating system allows application software to use IN and OUT instructions.
You can add I/O ports to the window - type them as a byte, word (2 bytes) or dword (4 bytes). Use New to add a new port to the window. Once you have done this, four items appear on the line:
- the read button, [r]
- the write button, [w]
- the port address
- the value, which appears as question marks when you first enter a port address
The debugger doesn't automatically read or write the value since this can have side effects. In order to read the displayed value from the port, click on the read button. To write the displayed value back, click on the write button. To change the value, double-click on it, or cursor to it and press Enter. Press the right mouse button to access the following popup menu items:
- Modify
- Change the selected item. You can change either the value field or the
address field.

This doesn't write the value back to the port. You must choose Write to write to the port.
- New
- Add a new line to the window. You can have several I/O ports displayed at once.
- Delete
- Delete the selected line from the window.
- Read
- Read the displayed value from the port.
- Write
- Write the displayed value to the port.
- Type
- Change the display type of the value. The size of this type determines how much is read from or written to the I/O port.
80x87 FPU window
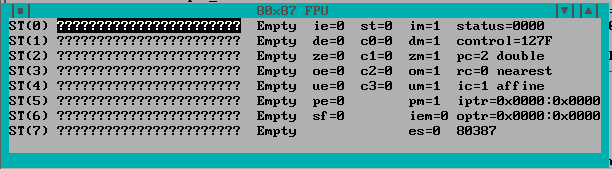
Choose FPU 80x87 from the Data menu to open the FPU window. This window displays the current value and status of all the 80x87 coprocessor registers. If you're debugging a program that uses 8087 emulation, this window displays the contents of the emulator's data area. To change a value, double-click on it, or cursor to it and press Enter.
- Modify
- Change the value of the selected register or bit. You're prompted for a new value, unless you're modifying a bit. A bit toggles between 0 and 1.
- Hex
- Toggle the FPU window display between hexadecimal and floating-point display. This menu item sets options on a per-window basis, overriding the global settings. When you use the menu item to change these settings, they aren't saved between debugging sessions. To change an option permanently, see ``Window Options Dialog.''