Remote Debugging
Remote debugging allows you to run the debugger on one side of a communication link, while the application being debugged runs on the other. Remote debugging is required when, for example, there isn't enough memory to run both the debugger and the application on the same machine.
This chapter covers the following:
- remote debugging with the QNX network
- remote debugging without the QNX network
- descriptions of debugging on various types of links
Remote debugging with the QNX network
The easiest way to debug an application that's running on another node is to use the QNX network. QNX integrates a network of nodes into a single, homogeneous set of resources, and you can run a program or access a file on any machine (provided you have the appropriate authority).
As discussed in the section ``Syntax'' in the chapter Starting Up the Debugger, the syntax of the wd command is as follows:
wd {-options} [:symbol_file] [cmd_line]
where cmd_line is one of the following:
- [//nid] pid
- [//nid] executable {arguments}
If you want to run the debugger on your node and the application on another, simply specify the node ID (nid) of the other node as part of the command line. For example:
wd //7 my_program
runs the debugger on your current node and runs the command my_program on node 7.
The following command:
wd //7 //5/home/mary/my_program
runs the program my_program (found in /home/mary on node 5) on node 7, while the debugger runs on your current node.
For more information about the QNX network, see QNX System Architecture manual.
Remote debugging without the QNX network
If you're debugging a QNX application from another platform, you need to use a link between the two machines. In this scenario, you need to use the remote form of the Watcom Debugger.
The debugger is broken down into 4 parts:
- the Debugger (wd)
- This is the portion of the debugger that contains the user interface. It's the largest part of the debugger.
- the Debug Kernel
-
The debugger interprets your requests and sends low-level requests
to the debug kernel.
This is a small executable that's dynamically loaded by the debugger or
a remote debug server and used to control your application.
The following files are available:
- std.trp
- the standard trap file
- std.dll
- for OS/2 applications
- rsi.trp
- for Tenberry Software 32-bit DOS/4G(W) applications
- ads.trp
- for AutoCAD applications
- pls.trp
- for Phar Lap 32-bit applications
- pmd.trp
- for postmortem debugging support
- Remote Trap Files
- These are versions of the debug kernel file that take requests and send them across a communications link to a remote debug server. You choose a trap file using the debugger's TRap option, as described in the section ``Command Line Options'' in the chapter Starting Up the Debugger. Trap files have a 3-letter filename that represents the name of the communications layer being used. The file extension is trp or dll.
- Remote Debug Servers
- These executable files receive requests from a communications link and pass them to a debug kernel. Remote debug server names all start with ???serv. The first 3 letters represent the communication layer being used and correspond to the trap file that's used on the other side of the link.
In the following examples the notation shown below, indicates that cmd1 is to be run on machine A, and cmd2 is to be run on B:
A>cmd1
B>cmd2
Machine A is the QNX machine that runs the application. The debugger runs on machine B, using the command syntax appropriate to the operating system in use.
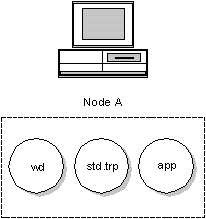
A normal non-remote debugging session just uses the user interface and the debug kernel. All components run on the same machine. This simple debugging session would be started with the command:
A>wd app
A remote debugging session adds a remote debug server and a remote trap file as well. For example, using the parallel port to debug between two machines would be accomplished using the following components:
A>parserv
B>wd -tr=par app
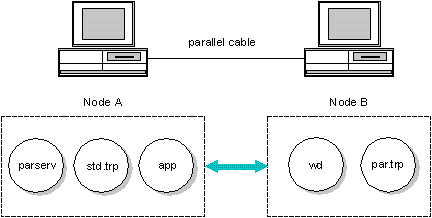
To start the above remote debugging session, follow these steps:
- Connect the two machines with a parallel cable, as described in the section ``Parallel Port Wiring Considerations'' in Appendix C: Wiring for Remote Debugging.
- Start the remote debug server parserv on one machine.
- Start the debugger with the option -trap=par on the other machine. This causes the debugger to load the remote trap file par. This communicates across the remote link to parserv, which in turn communicates with the debug kernel std in order to debug the application.
The rest of the debugger command line is identical to the command you would type if you were debugging the application locally.
 |
You must start the remote debug server first. If you don't, the remote trap file isn't able to establish a communication link and the debugger refuses to start. |
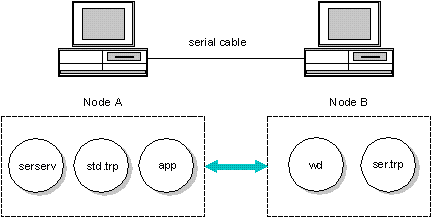
The following diagram shows debugging on a serial link:
A>serserv -tr=rsi
B>wd -tr=ser app
Link descriptions
The debugger provides the following remote link capabilities:
- PAR
- This link supports communication the parallel or printer port. Several different cable configurations are supported.
- SER
- This link uses the serial ports to communicate. Baud rates of up to 115k are supported. :cmt..note DQV :cmt.This link communicates between two DESQView DOS boxes. -->
- TCP
- This link uses TCP/IP to communicate internally between sessions.
These links are supported on the following operating systems:
- PAR
- DOS, OS/2, Windows 3.x, NetWare, and QNX.
- SER
- DOS, OS/2, and QNX.
- TCP
- OS/2, Windows NT, Windows 95, and QNX.
Communication parameters may be passed to the remote trap file and the remote server. They are passed to the remote trap file by following the name of the trap file with a semicolon and the parameter. For example:
A>serserv 2.4800
passes the parameter 2.4800 to the remote debug server. To pass the same parameter to the remote trap file, use:
B>wd -tr="ser;2.4800" app
These link parameters are specific to each remote link and are described in the following sections.
PAR (parallel)
This link communicates over the parallel port. Three different cable types may be used. They are called the LapLink, Flying Dutchman, and WATCOM cables. Although the WATCOM cable communicates considerably faster than the other two, we have found it to be unreliable on some printer cards. These cables are described in the section ``Parallel Port Wiring Considerations'' in Appendix C: Wiring for Remote Debugging.
The parameter to this link is a number from 1 to 3. This tells the software which parallel port the cable is connected to (LPT1, LPT2, LPT3). The default is 1. The parameter used on each side of the link depends on which printer port the cable is plugged into on that machine. It need not be the same on both sides. The following example shows how to debug across a parallel cable plugged into printer port 3 on one machine and port 2 on the other:
A>parserv 3
B>wd -tr="par;2" app
SER (serial)
This link communicates over the serial port. For wiring details, see ``Serial Port Wiring Considerations'' in Appendix C: Wiring for Remote Debugging. The debugger and server automatically synchronize on a communications speed. They may communicate at baud rates as high as 115k. You don't need to use the stty command.
The parameter to this link takes the form:
nid,port_number.baud_rate
where
- nid
- the ID of the node the serial port is on.
- port_number
- a number from 1 to 3 indicating which serial port the cable is connected to. The default is 1.
- baud_rate
- the maximum baud rate at which to communicate.
If you already know the maximum baud rate at which the two
machines can communicate, this parameter speeds up
the connection time by eliminating some of the synchronization
protocol.
The baud_rate variable may be any of 115200, 57600, 38400, 19200, 9600, 4800, 2400, or 1200. It may be shortened to the first 2 digits.
A special baud rate of 0 is also allowed. This should be used if the serial port has been pre-assigned using the mode or stty command. The pre-assigned baud rate is used and the baud rate negotiation is avoided. This allows you to debug over a modem.
The following example shows how to debug across a serial cable using default settings:
A>serserv
B>wd -tr=ser app
The following example shows how to debug across a serial cable using serial port 2 on each machine setting the maximum baud rate to 9600:
A>serserv 2.9600
B>wd -tr="ser;2.9600" app
Under QNX, a node id may be specified followed by a comma if the serial port isn't located on the current node. For example, serserv 3,1.9600 would use the device //3/dev/ser1 at a baud rate of 9600.
TCP/IP (Internet packets)
The TCP/IP link allows you to communicate between any two sessions using TCP/IP if you have installed TCP/IP support. See your network documentation for details on installing TCP/IP support.
In order to use TCP/IP to remotely debug a program, you must start the TCPSERV server program first. For example,
A>tcpserv
Socket port number: 1024
WATCOM TCP/IP Debug Server
Version 10.6
Copyright by WATCOM International ...
Press 'q' to exit
The server program displays an available socket port number on the screen.
You also need to know your Internet Protocol (IP) address. This can be in alphanumeric or numeric form (for example, jdoe.watcom.on.ca or 172.31.0.99).
To use the remote TCP/IP server, you must specify the TCP/IP trap filename to the debugger along with an argument consisting of the socket port number given by TCPSERV and your IP address. You must also include the name of the application you wish to debug. For example:
B>wd -tr="tcp;1024.jdoe.watcom.on.ca" app
	or
B>wd -tr="tcp;1024.172.31.0.99" app
The TCP/IP remote debug service permits debugging of applications anywhere on the Internet. However, response varies with the type of connection involved.